
Deploy Couchbase Server and Sync Gateway on Docker Cloud behind a load balancer.
Also available as a screencast
Launch node cluster
Launch a node cluster with the following settings:
- Provider: AWS
- Region: us-east-1 (or whatever region makes sense for you)
- VPC: Auto (if you don’t choose auto, you will need to customize your security group)
- Type/Size: m3.medium or greater
- IAM Roles: None

Create Couchbase Server service
Go to Services and hit the Create button:

Click the globe icon and Search Docker Hub for couchbase/server. You should select the couchbase/server image:

Hit the Select button and fill out the following values on the Services Wizard:
- Service Name: couchbaseserver
- Containers: 2
- Deployment strategy: High Availability
- Autorestart: On failure
- Network: bridge

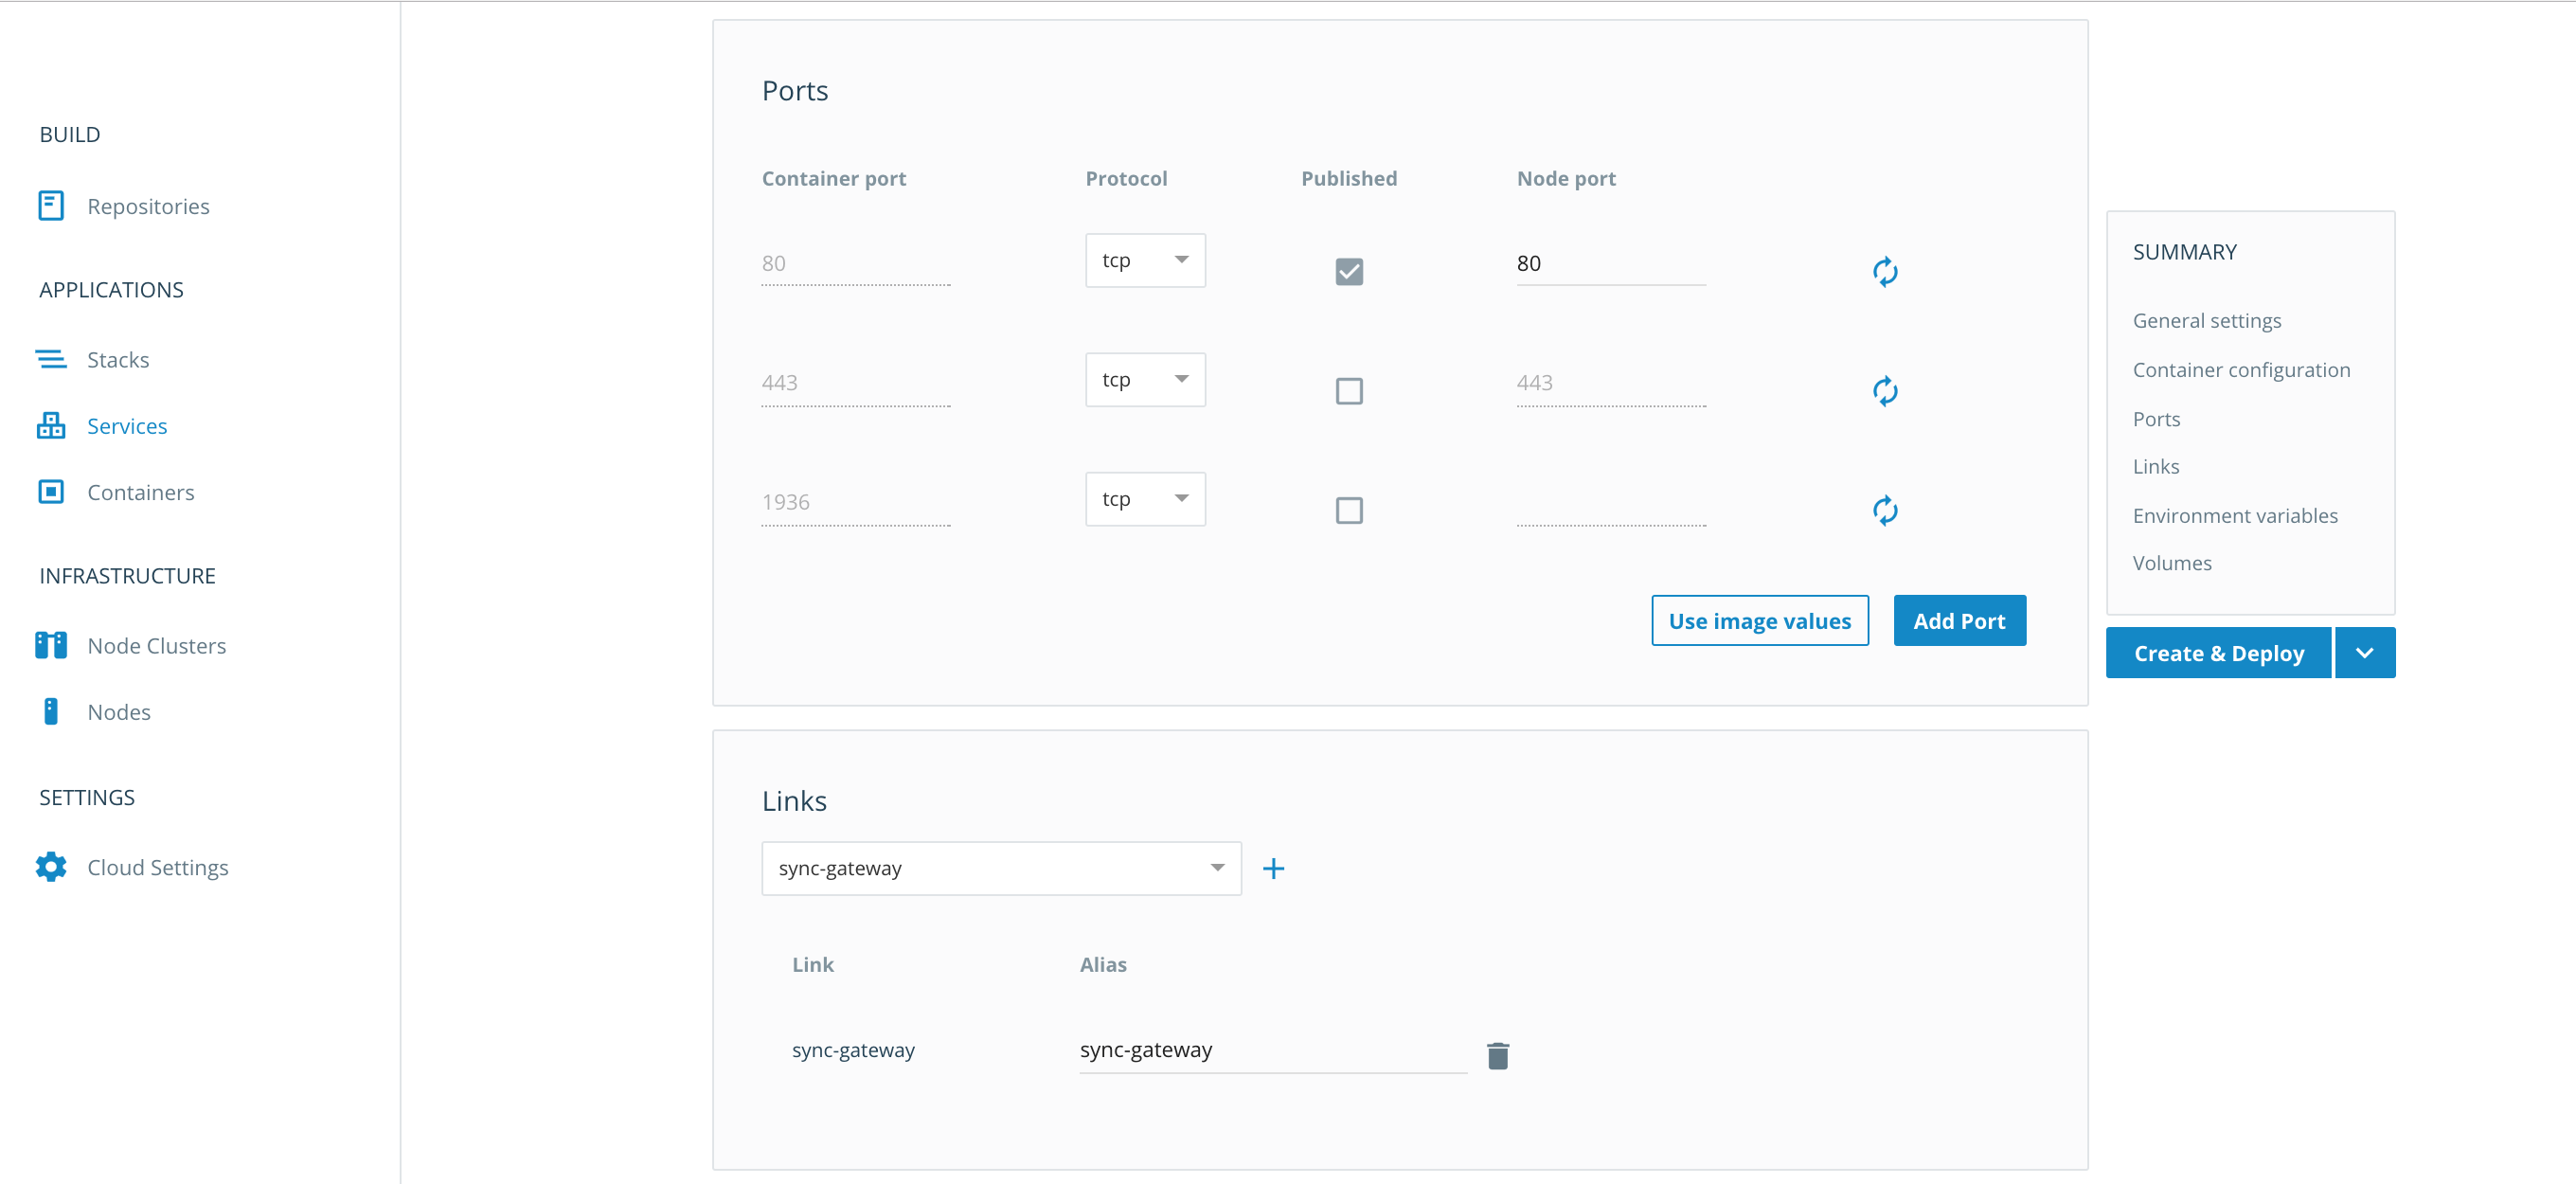
In the Ports section: Enable published on each port and set the Node Port to match the Container Port

Hit the Create and Deploy button. After a few minutes, you should see the Couchbase Server vervice running:

Configure Couchbase Server Container 1 + Create Buckets
Go to the Container section and choose couchbaseserver-1.
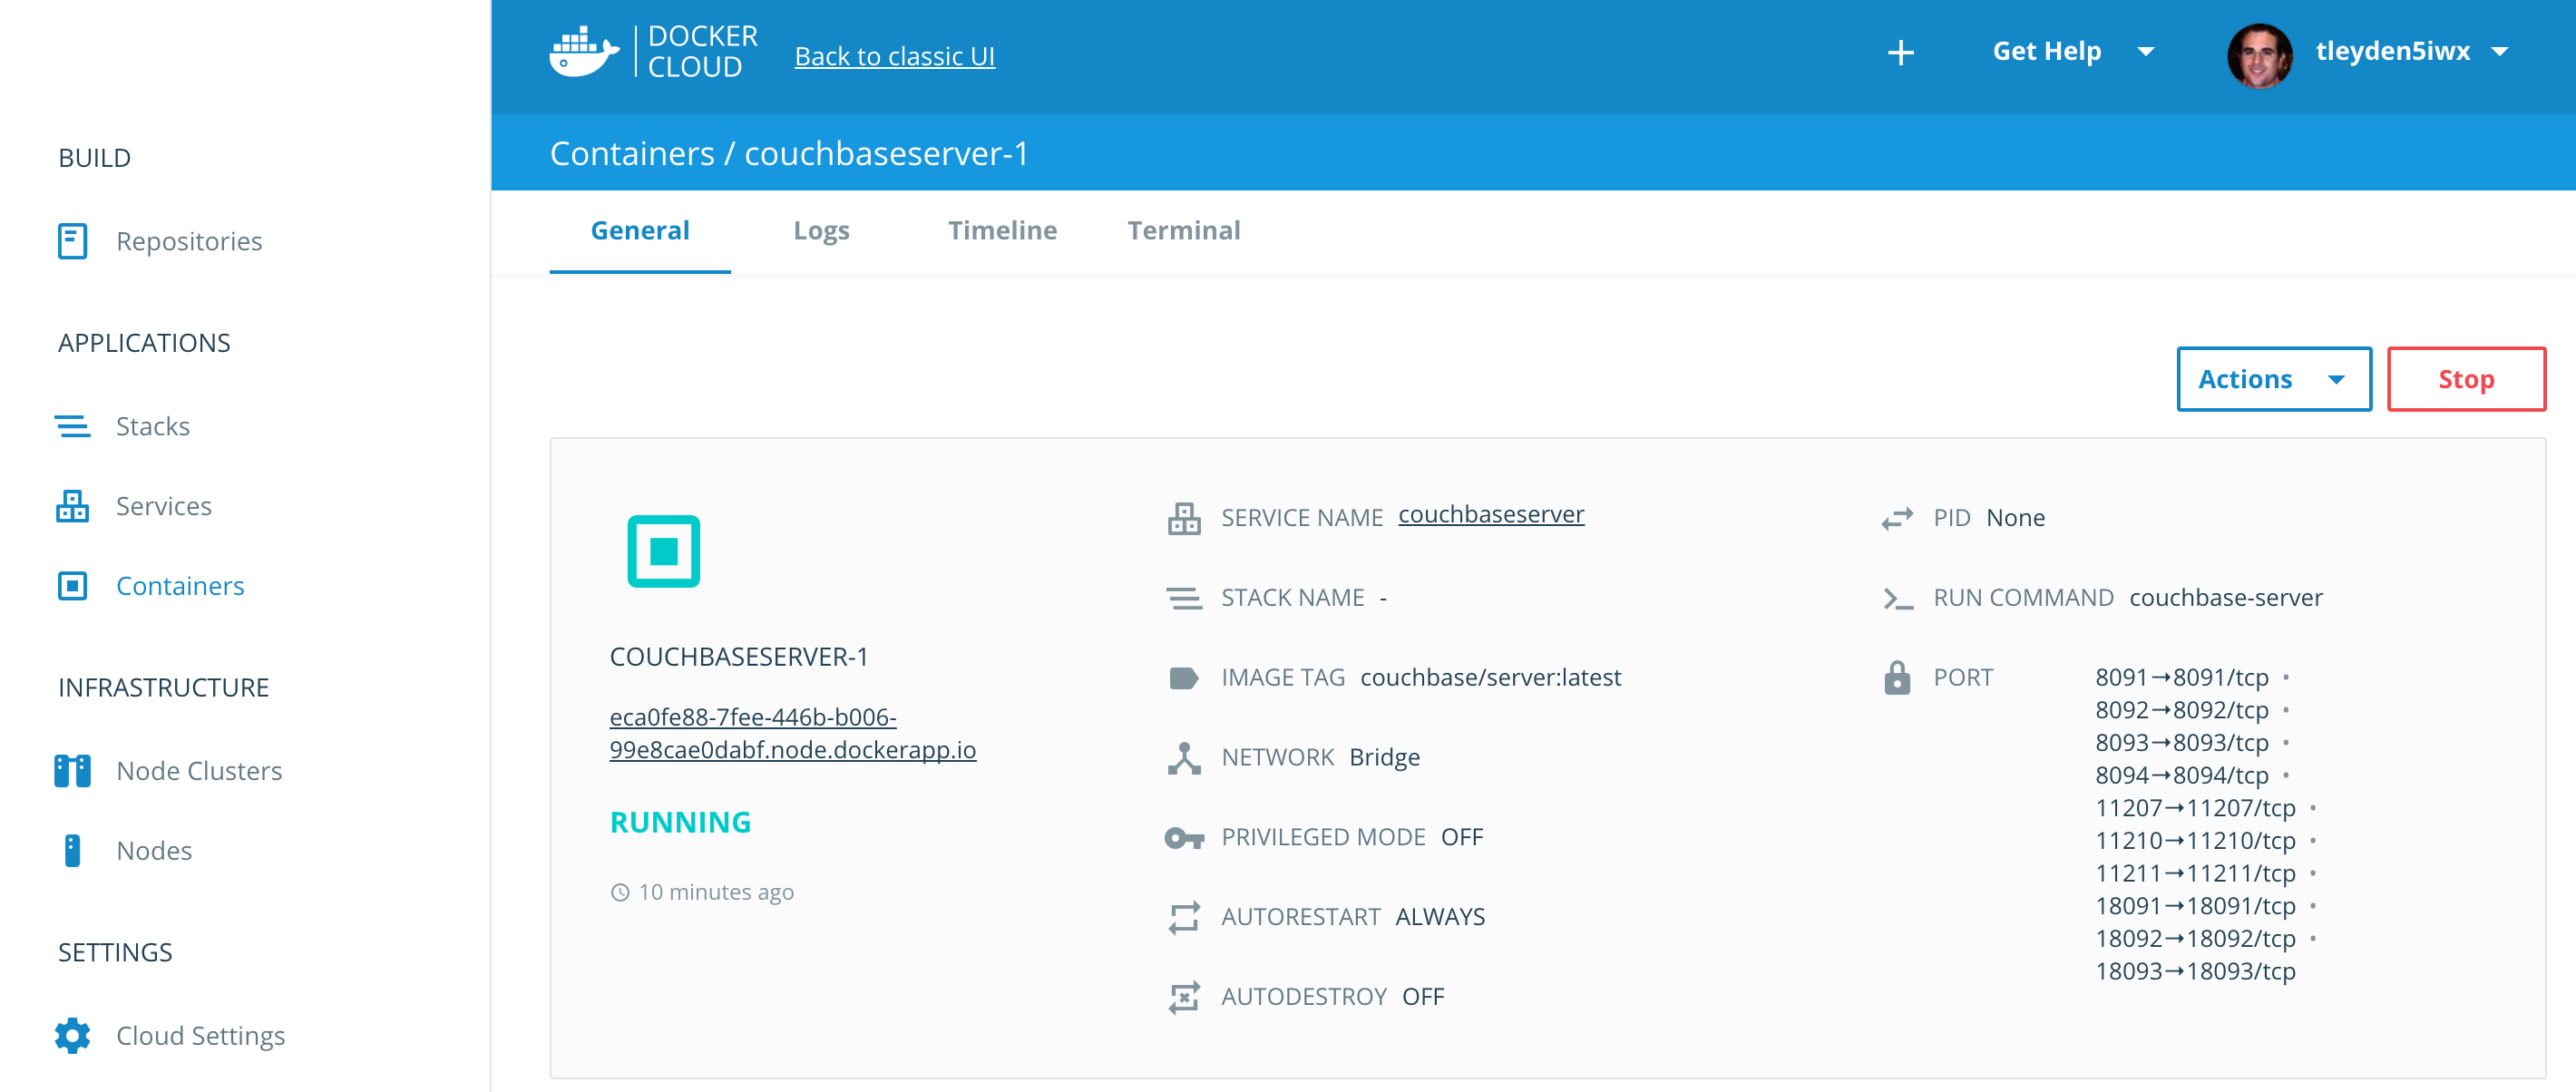
Copy and paste the domain name (eca0fe88-7fee-446b-b006-99e8cae0dabf.node.dockerapp.io) into your browser, adding 8091 at the end (eca0fe88-7fee-446b-b006-99e8cae0dabf.node.dockerapp.io:8091)
You should now see the Couchbase Server setup screen:

You will need to find the container IP of Couchbase Server in order to configure it. To do that, go to the Terminal section of Containers/couchbaseserver-1, and enter ifconfig.

Look for the ethwe1 interface and make a note of the ip: 10.7.0.2 — you will need it in the next step.
Switch back to the browser on the Couchbase Server setup screen. Leave the Start a new cluster button checked. Enter the 10.7.0.2 ip address (or whatever was returned for your ethwe1 interface) under the Hostname field.

and hit the Next button.
For the rest of the wizard, you can:
- skip adding the samples
- skip adding the default bucket
- uncheck Update Notifications
- leave Product Registration fields blank
- check “I agree ..”
- make sure to write down your password somewhere, otherwise you will be locked out of the web interface
Create a new bucket for your application:

Configure Couchbase Server Container 2
Go to the Container section and choose couchbaseserver-2.
As in the previous step, copy and paste the domain name (4d8c7be0-3f47-471b-85df-d2471336af75.node.dockerapp.io) into your browser, adding 8091 at the end (4d8c7be0-3f47-471b-85df-d2471336af75.node.dockerapp.io:8091)
Hit Setup and choose Join a cluster now with settings:
- IP Address: 10.7.0.2 (the IP address you setup the first Couchbase Server node with)
- Username: Administrator (unless you used a different username in the previous step)
- Password: enter the password you used in the previous step
- Configure Server Hostname: 10.7.0.3 (you can double check this by going to the Terminal for Containers/couchbaseserver-2 and running
ifconfigand looking for the ip of theethwe1interface)

Trigger a rebalance by hitting the Rebalance button:

Sync Gateway Service
Now create a Sync Gateway service.
Before going through the steps in the Docker Cloud web UI, you will need to have a Sync Gateway configuration somewhere on the publicly accessible internet.
Warning: This is not a secure solution! Do not use any sensitive passwords if you follow these steps
To make it more secure, you could:
- Use a Volume mount and have Sync Gateway read the configuration from the container filesystem
- Use a HTTPS + Basic Auth for the URL that hosts the Sync Gateway configuration
Create a Sync Gateway configuration on a github gist and get the raw url for the gist.
- Make sure to set the
servervalue tohttp://couchbaseserver:8091so that it can connect to the Couchbase Service setup in a previous step. - Use the bucket created in the Couchbase Server setup step above
In the Docker Cloud web UI, go to Services and hit the Create button again.
Click the globe icon and Search Docker Hub for couchbase/sync-gateway. You should select the couchbase/sync-gateway image.
Hit the Select button and fill out the following values on the Services Wizard:
- Service Name: sync-gateway
- Containers: 2
- Deployment strategy: High Availability
- Autorestart: On failure
- Network: bridge

In the Container Configuration section, customize the Run Command to use the raw URL of your gist, eg: https://gist.githubusercontent.com/tleyden/f260b2d9b2ef828fadfad462f0014aed/raw/8f544be6b265c0b57848

In the Ports section, use the following values:

In the Links section, choose couchbaseserver and hit the Plus button

Click the Create and Deploy button.
Verify Sync Gateway
Click the Containers section and you should have two Couchbase Server and two Sync Gateway containers running.

Click the sync-gateway-1 container and get the domain name (eca0fe88-7fee-446b-b006-99e8cae0dabf.node.dockerapp.io) and paste it in your browser with a trailing :4984, eg eca0fe88-7fee-446b-b006-99e8cae0dabf.node.dockerapp.io:4984
You should see the following JSON response:
1 2 3 4 5 6 7 8 | |
Setup Load Balancer
Click the Services section and hit the Create button. In the bottom right hand corner look for Proxies and choose dockercloud/haproxy

General Settings:
- Service Name: sgloadbalancer
- Containers: 1
- Deployment Strategy: High Availability
- Autorestart: Always
- Network: Bridge
Ports:
- Port 80 should be Published and the Node Port should be set to
80
Links:
- Choose sync-gateway and hit the Plus button
Hit the Create and Deploy button
Verify Load Balancer
Click the Containers section and choose sgloadbalancer-1.

Copy and paste the domain name (eg, eca0fe88-7fee-446b-b006-99e8cae0dabf.node.dockerapp.io) into your browser.
You should see the following JSON response:
1 2 3 4 5 6 7 8 | |
Congratulations! You have just setup a Couchbase Server + Sync Gateway cluster on Docker Cloud.