A channel describes a transport of sorts. You can send a thing down that transport. When using a chan chan, the thing you want to send down the transport is another transport to send things back.
They are useful when you want to get a response to something, and you don’t want to setup two channels (it’s generally considered bad practice to have data moving bidirectionally on a single channel)
Visual time lapse walkthrough
Keep in mind that Goroutine C is the “real consumer” even though it will be the one which writes to the request channel.
The request channel starts out empty.
Goroutine C passes a “response channel” to go routine D via the request channel
Goroutine C starts reading from the (still empty) response channel.
Goroutine D writes a string to the response channel
Goroutine C now is able to read a value from response channel, and get’s the “wassup!” message
package main

import "fmt"
import "time"

func main() {

     // make the request chan chan that both go-routines will be given
     requestChan := make(chan chan string)

     // start the goroutines
     go goroutineC(requestChan)
     go goroutineD(requestChan)

     // sleep for a second to let the goroutines complete
     time.Sleep(time.Second)

}

func goroutineC(requestChan chan chan string) {

     // make a new response chan
     responseChan := make(chan string)

     // send the responseChan to goRoutineD
     requestChan <- responseChan

     // read the response
     response := <-responseChan

     fmt.Printf("Response: %v\n", response)

}

func goroutineD(requestChan chan chan string) {

     // read the responseChan from the requestChan
     responseChan := <-requestChan

     // send a value down the responseChan
     responseChan <- "wassup!"

}
Click the “Get Genymotion” button and download the appropriate version for your OS.
Run the Genymotion application
It will install Genymotion and Genmotion shell — run the Genymotion application (not the shell).
When you run it, you will see:
Click add new virtual device. It will ask you to login, then show you a list:
Pick the virtual device you want and it will download it.
Try starting a virtual device
Here’s what happened on my system:
Hit Play to run virtual device
It asked me to configure the Android SDK location, I said “No”
Then it gave me an error that VirtualBox was not installed
I started VirtualBox manually
I retried running the virtual device, this time it worked and I saw
Configure Android Studio plugin
Go to Preferences / Plugins and click “Browse Repositories”, then search for Genymotion. Right click and choose “Download and Install”.
Restart Android Studio and you should see a new icon in your IDE.
Click the icon and it will bring up Preferences, and choose the path to the Genymotion application.
Now if you click the Genymotion icon again, you will see the list of devices available:
Start an emulator
Click the Genymotion icon within Android studio, select a virtual device, and hit start.
It will ask you to choose the location of the SDK:
On Mac OSX, I was not able to brows to the path since the application was greyed out in the chooser dialog, so I went onto the shell and found it (/Applications/Android Studio.app/sdk) and just copied and pasted it:
Select a virtual device, and hit start (again). It should come up now.
Deploy an application/test to that emulator
In Android Studio, hit the “Play” or “Debug” button, and you should see the dialog that asks you to choose an emulator:
and one of the emulators will be the Genymotion emulator. After you choose that emulator and hit “OK”, it will run your application in the Genymotion emulator (this is showing the Grocery Sync demo app for Couchbase Lite):
Suppose you want to add an http handler which can show some things that in memory.
Simple, right? Actually, if you aren’t careful, doing this can lead to data races, even though only one goroutine is writing the data at any given time.
Here’s the golang code (also on github) that reproduces the issue:
if you run this code with go run main.go and then open http://localhost:8080 in your browser, it will work as expected.
But not so fast! Lurking in this code are data races, and if you run this with race detection enabled using go run -race main.go and then access it with the browser, it will panic with:
12345678910
==================
WARNING: DATA RACE
Read by goroutine 6:
  main.func·001()
      /../concurrentaccess/main.go:45 +0x9e
      ...
Previous write by goroutine 4:
  main.updateFooSlice()
      /../concurrentaccess/main.go:35 +0x98
      ...
because there are two goroutines accessing the same slice without any protection — the main goroutine running the http server, and the goroutine running updateFooSlice.
Fix #1 – use sync.mutex to lock the slice
This isn’t necessarily the best way to fix this, but it’s the simplest to understand and explain.
Here are the changes to the code (also on github):
Import the sync package
Create a sync.Mutex object in the package-global namespace
Before updating the slice, lock the mutex, and after updating it, unlock it.
Before the http handler access the slice, it locks the mutex, and after it’s done, it unlocks it.
If you now re-run the code with the -race flag and access http://localhost:8080, it won’t panic.
Digression – chan chan
Before we can talk about Fix #2, we need to take a digression to talk about chan chan’s — channels which contain other channels as the morsels of data that pass through the channel tubes (metachannels, if you will).
tl;dr A channel describes a transport of sorts. You can send a thing down that transport. When using a chan chan, the thing you want to send down the transport is another transport to send things back.
In this version of the fix, the goroutine running the http handler (the main goroutine in this case), makes a response chan and passes it into a request chan chan that both goroutines can access. It then reads the response from the response chan, which will contain a copy of the FooSlice.
The other goroutine updates the FooSlice and is also checking the request chan chan for new messages. If it gets a new request message, it makes a copy of the FooSlice and sends it to the response chan.
123456789101112131415
func updateFooSlice(fooSlice FooSlice) {
        t := time.Tick(time.Second)
        for {
                select {
                case <-t:
                        foo := &Foo{content: "new"}
                        fooSlice[0] = foo
                        fooSlice[1] = nil
                case ch := <-request:
                        fooSliceCopy := make(FooSlice, len(fooSlice))
                        copy(fooSliceCopy, fooSlice)
                        ch <- fooSliceCopy
                }
        }
}
Again, if you now re-run this code with the -race flag and access http://localhost:8080, it won’t panic.
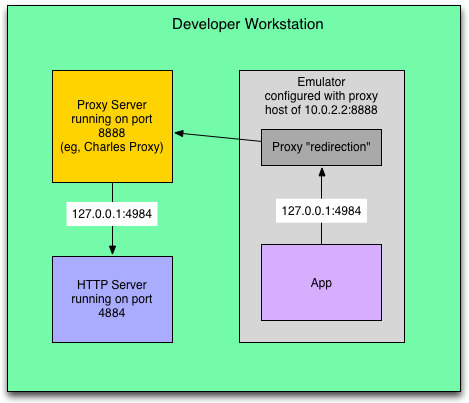
If you need to debug the HTTP communication between a server and an Android app running in an emulator or device, here’s some instructions on how I went about doing it.
As far as proxy configuration, the defaults should be fine. It should be listening on port 8888 and proxying everything. If you need HTTPS, you might have to configure that, I don’t remember if it’s enabled by default.
Configure the Android Emulator to use that proxy
There is a blog that describes how to get to this screen, I don’t have the link handy. Essentially once you get to this screen, just update the ip to have the special 10.0.2.2 ip address which represents your workstation, and the port the proxy is listening on (port 8888).
Run an HTTP server on your workstation, on port 4984
Actually use any port you want, but in my case I’m connecting to a server that runs on port 4984.
Configure your app to connect to 127.0.0.1:4984
This is actually a bit counterintuitive, but the idea is that the address must be reachable from the workstation’s network, not from the emulator’s network.
So for that reason, if the server is running on the workstation, you would want to use 127.0.0.1 as the IP.
As long as the server is reachable from your workstation, you can use that IP and it will go through the proxy.
View HTTP traffic in proxy
Here’s what the HTTP JSON response looks like in the proxy:
If you are using the Genymotion emulator
The Genymotion emulator has a different method of modifying the proxy setting:
In your virtual device:
Go to Android settings menu
In Wireless & Networks section, select Wi-Fi
Press and hold for 2 seconds WiredSSID network in the list
Choose Modify Network
Check Show advanced options
Select Manual for Proxy settings menu entry
Now enter the proxy settings provided by your network administrator
Ip: 10.0.3.2 (this is a special ip that Genymotion uses to connect back to the host)
This tutorial will show you how to run a cluster of Couchbase Servers, where each node is running inside of a docker image.
This probably looks like a lot of layers, and you might be wondering if this will make your system crawl — but bear in mind that the Docker virtualization model is very lightweight, and so basically everything under CoreOS has very little resource overhead.
Install Docker and dependencies
If you are on OSX and don’t have Docker installed, check out Install Docker on OSX before proceeding.
Edit vagrant file to add port mappings
In order to access all the Couchbase Server nodes from the host, which doesn’t currently work, you would need to add the following entries to your Vagrantfile:
As mentioned, accessing all of the Couchbase Server nodes from the host does not currently work. However, I think at least some of these entries are needed, so to be on the safe side just add all of them.
Start CoreOS and ssh in
Execute the following commands in the directory where you have your CoreOS Vagrantfile. In my case, I have it under ~/Tools/coreos-vagrant and it contains a Vagrantfile, a README.md file, and a few others.
Find the name of the docker instance by running $ docker ps
123
core@localhost ~ $ docker ps
CONTAINER ID        IMAGE                     COMMAND                CREATED              STATUS              PORTS                                                                      NAMES
845987ce946b        dustin/couchbase:latest   /bin/sh -c /usr/loca   About a minute ago   Up About a minute   0.0.0.0:11210->11210/tcp, 0.0.0.0:8091->7081/tcp, 0.0.0.0:8092->8092/tcp   purple_kangaroo
In this case it’s purple_kangaroo.
Now take a look at the logs for that docker instance:
If you only want to run one Couchbase Server node, you are pretty much done and you can skip to the section below to login to the Couchbase Server admin
If you want to run a cluster of Couchbase Server nodes, read on.
Start docker images for other nodes
1
$ docker run -i -t -d -link purple_kangaroo:alpha dustin/couchbase:latest
This will start another node that is linked to the initial node, and will be in the same cluster. There is some Weird Magic behind the scenes that makes that all work.
Go to Couchbase Server admin
Open http://localhost:8091/ in your browser, and you should see a login screen, where the default credentials are Administrator/password.
After you login, you should see the Admin UI with three nodes in your cluster:
In an unreleased version of Couchbase Lite for Android, I was seeing the following error:
12
SQLiteConnectionPool The connection pool for database has been unable to grant a connection to thread
SQLiteConnectionPool(14004): Connections: 0 active, 1 idle, 0 available.
Here’s what turned out to be happening
Create a single SQLiteDatabase object that is shared among all threads
WriterThread spawned
t0: WriterThread opens a transaction and inserts some data
t1: WriterThread spawns ReaderThread
t2: ReaderThread attempts to read some data
t3: WriterThread calls .join() on ReaderThread to wait for it to finish
Deadlock!
Digging into the deadlock
WriterThread has an open transaction, and therefore is holding on to the one and only connection owned by the single SQLiteDatabase object
ReaderThread is trying to get a new connection to execute its statement, but cannot because WriterThread is holding the only one available
WriterThread is waiting for ReaderThread to finish so it can finish it’s transaction and release the connection.
Fix Idea #1 – Don’t make WriterThread join ReaderThread
This is the somewhat naive and obvious fix.
In the case of this particular bug, it looks like the code can be reworked to avoid this problem altogether, and should end up with a cleaner design anyway.
(Bad) Fix Idea #2 – Each thread gets its own SQLiteDatabase object (for the same database)
You would think this could solve the problem, and it probably would, but there are some major caveats here.
If you try to write to the database from actual distinct connections at the same time, one will fail. It will not wait till the first is done and then write. It will simply not write your change. Worse, if you don’t call the right version of insert/update on the SQLiteDatabase, you won’t get an exception. You’ll just get a message in your LogCat, and that will be it.
So to avoid this kind of hellish scenario, it’s definitely safer to stick with a Single SQLite connection
Is there really a good fix?
So what if you absolutely needed to have the ability to have WriterThread join ReaderThread, and you wanted to avoid giving each thread it’s own SQLiteDatabase object, how could that be accomplished?
Or is that just a silly scenario and it’s better to just not do that? (it seems fairly easy to do it by accident in any scenarios where threads are waiting on another and both accessing the same database)
Actually, I don’t know — it’s an open question. Comments welcome.
To make sure Vagrant is installed correctly, run the following commands to see if Ubuntu Precise comes up and you are able to ssh into it.
123
vagrant init precise32 http://files.vagrantup.com/precise32.box
vagrant up
vagrant ssh
If that doesn’t work, you should probably fix it before moving on. Otherwise, keep reading.
Install/Run CoreOS
123
git clone https://github.com/coreos/coreos-vagrant/
cd coreos-vagrant
vagrant up
SSH into CoreOS
1
vagrant ssh
Run stock ubuntu docker image
1
docker run -t -i ubuntu bash
After running this, you should be ssh’d inside of an Ubuntu shell, running under docker (running inside of VirtualBox .. etc, all the way up the onion)
is there a better way? When I tried using make(), I got the error err: json: Unmarshal(non-pointer checkerlution.Document). Using make() followed by & didn’t work either.
Type Assertion hell
I’m trying to get some data that’s fairly deep in some json, and ended up doing a lot of awkward feeling type assertions:
Write a server that uses tcp sockets which returns images to clients, and avoids duplicate work for concurrent requests for the same image.
Description
A server will listen for tcp client connections and generate PNG checkerboard images and return them to clients that request them. Example checkerboard image:
The client will send a single parameter to the server after it opens the tcp socket connection to the server:
The size of the “checkboard image”, which will be a single scalar value like 5, which will result in a 5x5 square, as shown above.
The server will use the following default values when generating the checkerboard image:
size: each square will be 60 x 60 pixels.
color: squares will be alternating black and white, with black for the square in the 0th row and 0th column, and white for the square in the 1st row and 0th column, etc. Exactly as shown above.
Basic Requirements
Written in either Java or Scala
To generate the actual image, you can use anything you want. The image format can be any popular image format (PNG, JPEG, GIF, etc..)
For the data structures required by the server, you can use any existing data structures within Java itself or a 3rd party, there is no requirement to develop your own.
The server will respond with the image data in PNG format, and then close the connection.
Advanced Requirements
In the method that generates the square, there must be a call to Thread.sleep(Y) before returning. Y represents number of milliseconds to sleep, and will be a random number between 0 and 5000.
The server can handle multiple client requests in parallel (as opposed to handling them in serial). In other words, if client1 contacts the server, and then client2 contacts the server a few milliseconds later, there is a chance that client2 will receive a response before client1, depending on the random sleep described above.
In order to avoid needlessly generating the same image twice, if the server is asked to generate a square of size X by client1, and then again asked to generate another square of size X by client2 before it has returned the square to client1, it will simply wait for the square for client1 is finished being generated and return that same square data to both client2 and client1. Here is an example timeline to show how events would roughly be ordered:
At 12:00:00 Client1 asks for square of size 6
At 12:00:01 The server starts to generate the square for client1
At 12:00:01 Client2 asks for square of size 6 (the server does not try to generate a new square, since there is already a pending request for an identical square)
At 12:00:06 The server finishes generating the square of size 6, as originally requested by client1
At 12:00:07 The server returns the square to client1
At 12:00:07 The server returns the same square to client2
Deliverables
server.sh – starts the server that listens on 8000
client.sh X – runs a client that:
connects to localhost:8000
passes the parameter X (the size of the checkboard image) to the server
reads the PNG into a file called X.png
prints a message to say its finished.
A zip file that contains all jar file dependencies or a document that describes on how to download the required dependencies
Shortcuts
If this feels like too much work, take the following shortcut:
Rather than return an image, just create a string which would represent the image, where X represents black and O represents white. Eg, if it was a 2x2 square, return “X00X”
Bonus points
Record your commits in a local git repository as you work, and submit a zip file of the repository along with the other deliverables
What’s a blog without a few tweets to spice it up?
Here’s my first attempt, which didn’t work. I modified my _config.yml file to have:
1
twitter_user: tleydn
After some desperate googling, I came across this blog post which seems to suggest that twitter support has been remoted from Octopress, with instructions on how to embed a twitter widget.
Here’s a few tricks to make it looks slightly less butt-ugly:
In the twitter widget generator, choose the “dark” theme.
Modify the widget class to have dimensions width="300" height="350" so that it is slightly less distracting when viewing content.
Adding an “About” page
I followed the instructions on Theming & Customization, which added an About section on the top of the sidebar on the right side.
I’m not a hipster, it’s just that my HTML coding skillz are stuck at about 1995. If you are seething with the overwhelming urge to tell me how to do this in 2013 CSS style, go right ahead and add a comment.